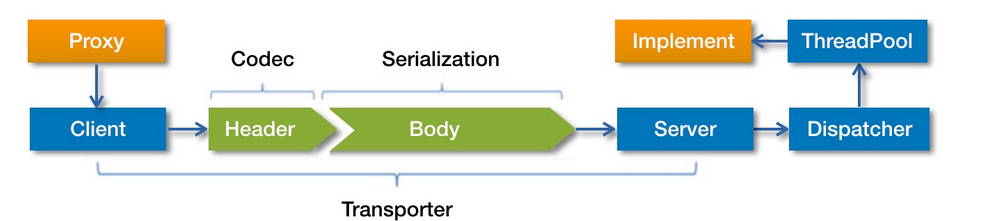
简介 Dubbo服务调用的基本过程如图:
首先服务消费者通过代理对象Proxy发起远程调用,接着通过网络客户端将编码后的请求发送给服务提供方的网络层上。Server收到请求之后,首先要做的就是对数据包进行解码。然后将解码后的请求发送至分发器,再由分发器将请求发送到指定的线程池上,最后由线程池调用具体的服务。这就是一个远程调用请求的发送过程。
服务调用过程源码分析 服务消费端进行服务调用过程 我们知道服务消费端是通过为接口生成的代理对象进行服务调用的,他的代理对象的实现如下:
1
2
3
4
5
6
7
8
9
10
11
12
13
14
15
16
17
18
19
20
21
22
23
24
25
26
27
28
public class proxy0 implements ClassGenerator .DC, EchoService, DemoService { public static Method[] methods; private InvocationHandler handler; public proxy0 (InvocationHandler invocationHandler) { this .handler = invocationHandler; } public proxy0 () { } public String sayHello (String string) { Object [] arrobject = new Object []{string}; Object object = this .handler.invoke(this , methods[0 ], arrobject); return (String)object; } public Object $echo (Object object) { Object [] arrobject = new Object []{object}; Object object2 = this .handler.invoke(this , methods[1 ], arrobject); return object2; } }
这个代理类的实现逻辑比较简单,首先将参数存储到数组中,然后调用InvocationHandler的实现类的invoke方法,然后得到一个调用结果,最后将这个结果返回给调用端。
也就是说这个代理类只做了三件事情:
将参数进行封装
调用invoke方法,进行服务调用
返回结果
下面我们来分析这个InvocationHandler的实现类的代码实现;
1
2
3
4
5
6
7
8
9
10
11
12
13
14
15
16
17
18
19
20
21
22
23
24
25
26
27
28
29
30
31
32
33
public class InvokerInvocationHandler implements InvocationHandler { private final Invoker<?> invoker; public InvokerInvocationHandler (Invoker<?> handler) { this .invoker = handler; } @Override public Object invoke (Object proxy, Method method, Object[] args) throws Throwable { String methodName = method.getName(); Class <?>[] parameterTypes = method.getParameterTypes(); if (method.getDeclaringClass() == Object.class) { return method.invoke(invoker, args); } if ("toString" .equals(methodName) && parameterTypes.length == 0 ) { return invoker.toString(); } if ("hashCode" .equals(methodName) && parameterTypes.length == 0 ) { return invoker.hashCode(); } if ("equals" .equals(methodName) && parameterTypes.length == 1 ) { return invoker.equals(args[0 ]); } return invoker.invoke(new RpcInvocation (method, args)).recreate(); } }
这个类的invoke的实现逻辑非常的简单,如果调用的是Object中的一些方法,那么直接进行处理即可(这些方法根本不需要远程调用),否则通过Invoker接口的实现类的invoke方法进行远程调用。
这里的Invoker的实现类其实是MockClusterInvoker,它的内部封装了服务降级的逻辑,下面我们来看它的具体实现:
1
2
3
4
5
6
7
8
9
10
11
12
13
14
15
16
17
18
19
20
21
22
23
24
25
26
27
28
29
30
31
32
33
34
35
public class MockClusterInvoker <T> implements Invoker <T> { private final Invoker<T> invoker; public Result invoke (Invocation invocation) throws RpcException { Result result = null ; String value = directory.getUrl().getMethodParameter(invocation.getMethodName(), Constants.MOCK_KEY, Boolean.FALSE.toString()).trim(); if (value.length() == 0 || value.equalsIgnoreCase("false" )) { result = this .invoker.invoke(invocation); } else if (value.startsWith("force" )) { result = doMockInvoke(invocation, null ); } else { try { result = this .invoker.invoke(invocation); } catch (RpcException e) { if (e.isBiz()) { throw e; } else { result = doMockInvoke(invocation, e); } } } return result; } }
这里主要是对服务降级的处理,如果没有配置服务降级的逻辑,那么直接进行远程调用;如果服务降级信息配置为force那么直接降级,不发起远程调用;如果服务降级信息配置为fail,那么会尝试进行远程调用,如果失败那么就进行服务降级逻辑。
在这里我们就不深究这个服务降级的实现了,主要来看一看远程调用。在这个类中进行远程调用使用的是实现了Invoker接口的AbstractInvoker。
1
2
3
4
5
6
7
8
9
10
11
12
13
14
15
16
17
18
19
20
21
22
23
24
25
26
27
28
29
30
31
32
33
34
35
36
37
38
39
40
public abstract class AbstractInvoker <T> implements Invoker <T> { public Result invoke (Invocation inv) throws RpcException { if (destroyed.get()) { throw new RpcException ("Rpc invoker for service ..." ); } RpcInvocation invocation = (RpcInvocation) inv; invocation.setInvoker(this ); if (attachment != null && attachment.size() > 0 ) { invocation.addAttachmentsIfAbsent(attachment); } Map <String, String> contextAttachments = RpcContext.getContext().getAttachments(); if (contextAttachments != null && contextAttachments.size() != 0 ) { invocation.addAttachments(contextAttachments); } if (getUrl().getMethodParameter(invocation.getMethodName(), Constants.ASYNC_KEY, false )) { invocation.setAttachment(Constants.ASYNC_KEY, Boolean.TRUE.toString()); } RpcUtils.attachInvocationIdIfAsync(getUrl(), invocation); try { return doInvoke(invocation); } catch (InvocationTargetException e) { } catch (RpcException e) { } catch (Throwable e) { return new RpcResult (e); } } protected abstract Result doInvoke (Invocation invocation) throws Throwable; }
上面的代码的主要逻辑就是将信息添加到RpcInvocation#attachment,然后调用doInvoke执行后序逻辑。doInvoke是一个抽象方法,由子类DubboInvoker实现。
1
2
3
4
5
6
7
8
9
10
11
12
13
14
15
16
17
18
19
20
21
22
23
24
25
26
27
28
29
30
31
32
33
34
35
36
37
38
39
40
41
42
43
44
45
46
47
48
49
50
51
52
53
54
55
56
57
58
59
60
61
public class DubboInvoker <T> extends AbstractInvoker <T> { private final ExchangeClient[] clients; protected Result doInvoke (final Invocation invocation) throws Throwable { RpcInvocation inv = (RpcInvocation) invocation; final String methodName = RpcUtils.getMethodName(invocation); inv.setAttachment(Constants.PATH_KEY, getUrl().getPath()); inv.setAttachment(Constants.VERSION_KEY, version); ExchangeClient currentClient; if (clients.length == 1 ) { currentClient = clients[0 ]; } else { currentClient = clients[index.getAndIncrement() % clients.length]; } try { boolean isAsync = RpcUtils.isAsync(getUrl(), invocation); boolean isOneway = RpcUtils.isOneway(getUrl(), invocation); int timeout = getUrl().getMethodParameter(methodName, Constants.TIMEOUT_KEY, Constants.DEFAULT_TIMEOUT); if (isOneway) { boolean isSent = getUrl().getMethodParameter(methodName, Constants.SENT_KEY, false ); currentClient.send(inv, isSent); RpcContext.getContext().setFuture(null ); return new RpcResult (); } else if (isAsync) { ResponseFuture future = currentClient.request(inv, timeout); RpcContext.getContext().setFuture(new FutureAdapter <Object>(future)); return new RpcResult (); } else { RpcContext.getContext().setFuture(null ); return (Result) currentClient.request(inv, timeout).get(); } } catch (TimeoutException e) { throw new RpcException (..., "Invoke remote method timeout...." ); } catch (RemotingException e) { throw new RpcException (..., "Failed to invoke remote method: ..." ); } } }
这段代码包含了Dubbo对同步调用和一步调用的处理逻辑。Dubbo实现同步调用和异步调用比较关键的点是由谁负责调用ResponseFuture 的get方法,同步调用模式下是由框架来调用get方法的,而异步调用是由用户来调用get方法的。
这个方法主要完成的就是利用client进行远程调用,并处理同步调用和异步调用的细节。
下面我们来看一看ResponseFuture 的一个默认实现DefaultFuture .
1
2
3
4
5
6
7
8
9
10
11
12
13
14
15
16
17
18
19
20
21
22
23
24
25
26
27
28
29
30
31
32
33
34
35
36
37
38
39
40
41
42
43
44
45
46
47
48
49
50
51
52
53
54
55
56
57
58
59
60
61
62
63
64
65
66
67
68
69
70
71
72
73
74
75
76
77
78
79
80
81
82
83
84
85
86
87
88
89
90
91
92
93
94
95
public class DefaultFuture implements ResponseFuture { private static final Map <Long, Channel> CHANNELS = new ConcurrentHashMap <Long, Channel>(); private static final Map <Long, DefaultFuture> FUTURES = new ConcurrentHashMap <Long, DefaultFuture>(); private final long id; private final Channel channel; private final Request request; private final int timeout; private final Lock lock = new ReentrantLock (); private final Condition done = lock.newCondition(); private volatile Response response; public DefaultFuture (Channel channel, Request request, int timeout) { this .channel = channel; this .request = request; this .id = request.getId(); this .timeout = timeout > 0 ? timeout : channel.getUrl().getPositiveParameter(Constants.TIMEOUT_KEY, Constants.DEFAULT_TIMEOUT); FUTURES.put(id, this ); CHANNELS.put(id, channel); } @Override public Object get () throws RemotingException { return get(timeout); } @Override public Object get (int timeout) throws RemotingException { if (timeout <= 0 ) { timeout = Constants.DEFAULT_TIMEOUT; } if (!isDone()) { long start = System.currentTimeMillis(); lock.lock(); try { while (!isDone()) { done.await(timeout, TimeUnit.MILLISECONDS); if (isDone() || System.currentTimeMillis() - start > timeout) { break ; } } } catch (InterruptedException e) { throw new RuntimeException (e); } finally { lock.unlock(); } if (!isDone()) { throw new TimeoutException (sent > 0 , channel, getTimeoutMessage(false )); } } return returnFromResponse(); } @Override public boolean isDone () { return response != null ; } private Object returnFromResponse () throws RemotingException { Response res = response; if (res == null ) { throw new IllegalStateException ("response cannot be null" ); } if (res.getStatus() == Response.OK) { return res.getResult(); } if (res.getStatus() == Response.CLIENT_TIMEOUT || res.getStatus() == Response.SERVER_TIMEOUT) { throw new TimeoutException (res.getStatus() == Response.SERVER_TIMEOUT, channel, res.getErrorMessage()); } throw new RemotingException (channel, res.getErrorMessage()); } }
其实这段代码非常逻辑非常的简单,如果服务消费者还没有收到结果时,那么调用get方法,就会被阻塞。同步调用模式下,是由框架来执行get方法的,它会阻塞直至收到结果。而异步模式下将该对象封装到FutureAdapter对象中,然后设置到RpcContext中,供用户使用。这个适配器的主要作用就是将Dubbo的ResponseFuture 和JDK中的Future进行适配,这样用户可以调用Future的get方法的时候经过了FutureAdapter的适配,最终调用ResponseFuture 的get方法。
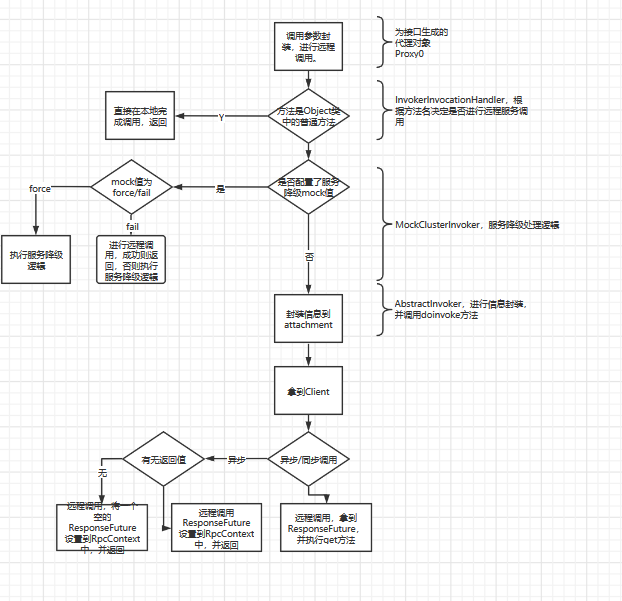
到此,整个执行的流程如下:
服务消费端发送请求 通过之前的源码分析,我们可以看出服务调用是通过client发送请求完成的,下面我们就来分析,这个请求发送的具体流程。
在之前提到的client其实就是实现ExchangeClient接口的ReferenceCountExchangeClient.
1
2
3
4
5
6
7
8
9
10
11
12
13
14
15
16
17
18
19
20
21
22
23
24
25
26
27
28
29
30
31
32
33
34
35
36
37
38
39
40
41
42
43
44
45
46
47
final class ReferenceCountExchangeClient implements ExchangeClient { private final URL url; private final AtomicInteger referenceCount = new AtomicInteger (0 ); public ReferenceCountExchangeClient (ExchangeClient client, ConcurrentMap<String, LazyConnectExchangeClient> ghostClientMap) { this .client = client; referenceCount.incrementAndGet(); this .url = client.getUrl(); } @Override public ResponseFuture request (Object request) throws RemotingException { return client.request(request); } @Override public ResponseFuture request (Object request, int timeout) throws RemotingException { return client.request(request, timeout); } public void incrementAndGetCount () { referenceCount.incrementAndGet(); } @Override public void close (int timeout) { if (referenceCount.decrementAndGet() <= 0 ) { if (timeout == 0 ) { client.close(); } else { client.close(timeout); } client = replaceWithLazyClient(); } } }
ReferenceCountExchangeClient 内部主要进行的是引用计数的处理,其它均调用的是被装饰对象的相关方法。
1
2
3
4
5
6
7
8
9
10
11
12
13
14
15
16
17
18
19
20
21
22
23
24
25
26
27
28
29
30
31
32
33
34
35
36
37
38
39
40
41
42
43
44
45
46
47
48
49
50
51
52
53
54
55
56
57
58
59
60
61
62
63
64
65
66
67
68
69
70
71
72
73
74
75
76
77
78
79
80
81
82
83
84
public class HeaderExchangeClient implements ExchangeClient { private static final ScheduledThreadPoolExecutor scheduled = new ScheduledThreadPoolExecutor (2 , new NamedThreadFactory ("dubbo-remoting-client-heartbeat" , true )); private final Client client; private final ExchangeChannel channel; private ScheduledFuture<?> heartbeatTimer; private int heartbeat; private int heartbeatTimeout; public HeaderExchangeClient (Client client, boolean needHeartbeat) { if (client == null ) { throw new IllegalArgumentException ("client == null" ); } this .client = client; this .channel = new HeaderExchangeChannel (client); String dubbo = client.getUrl().getParameter(Constants.DUBBO_VERSION_KEY); this .heartbeat = client.getUrl().getParameter(Constants.HEARTBEAT_KEY, dubbo != null && dubbo.startsWith("1.0." ) ? Constants.DEFAULT_HEARTBEAT : 0 ); this .heartbeatTimeout = client.getUrl().getParameter(Constants.HEARTBEAT_TIMEOUT_KEY, heartbeat * 3 ); if (heartbeatTimeout < heartbeat * 2 ) { throw new IllegalStateException ("heartbeatTimeout < heartbeatInterval * 2" ); } if (needHeartbeat) { startHeartbeatTimer(); } } @Override public ResponseFuture request (Object request) throws RemotingException { return channel.request(request); } @Override public ResponseFuture request (Object request, int timeout) throws RemotingException { return channel.request(request, timeout); } @Override public void close () { doClose(); channel.close(); } private void doClose () { stopHeartbeatTimer(); } private void startHeartbeatTimer () { stopHeartbeatTimer(); if (heartbeat > 0 ) { heartbeatTimer = scheduled.scheduleWithFixedDelay( new HeartBeatTask (new HeartBeatTask .ChannelProvider() { @Override public Collection <Channel> getChannels () { return Collections.<Channel>singletonList(HeaderExchangeClient.this ); } }, heartbeat, heartbeatTimeout), heartbeat, heartbeat, TimeUnit.MILLISECONDS); } } private void stopHeartbeatTimer () { if (heartbeatTimer != null && !heartbeatTimer.isCancelled()) { try { heartbeatTimer.cancel(true ); scheduled.purge(); } catch (Throwable e) { if (logger.isWarnEnabled()) { logger.warn(e.getMessage(), e); } } } heartbeatTimer = null ; } }
HeaderExchangeClient封装了心跳检测逻辑,然后通过调用HeaderExchangeChannel 对象的同签名方法。下面我们来分析HeaderExchangeChannel的代码实现:
1
2
3
4
5
6
7
8
9
10
11
12
13
14
15
16
17
18
19
20
21
22
23
24
25
26
27
28
29
30
31
32
33
34
35
36
37
38
39
40
41
42
43
44
final class HeaderExchangeChannel implements ExchangeChannel { private final Channel channel; HeaderExchangeChannel(Channel channel) { if (channel == null ) { throw new IllegalArgumentException ("channel == null" ); } this .channel = channel; } @Override public ResponseFuture request (Object request) throws RemotingException { return request(request, channel.getUrl().getPositiveParameter(Constants.TIMEOUT_KEY, Constants.DEFAULT_TIMEOUT)); } @Override public ResponseFuture request (Object request, int timeout) throws RemotingException { if (closed) { throw new RemotingException (..., "Failed to send request ...); } // 创建 Request 对象 Request req = new Request(); req.setVersion(Version.getProtocolVersion()); // 设置双向通信标志为 true req.setTwoWay(true); // 这里的 request 变量类型为 RpcInvocation req.setData(request); // 创建 DefaultFuture 对象 DefaultFuture future = new DefaultFuture(channel, req, timeout); try { // 调用 NettyClient 的 send 方法发送请求 channel.send(req); } catch (RemotingException e) { future.cancel(); throw e; } // 返回 DefaultFuture 对象 return future; } }
这个类的request方法,首先定义了一个Request对象,然后再将该对象传给NettyClient的send方法,进行后序的调用。而NettyClient本身并没有实现send方法,这个方法是通过继承AbstractPeer 得到得。
1
2
3
4
5
6
7
8
9
10
11
12
13
14
15
16
17
18
19
20
21
22
23
24
25
26
27
28
29
30
31
32
33
public abstract class AbstractPeer implements Endpoint , ChannelHandler { @Override public void send (Object message) throws RemotingException { send(message, url.getParameter(Constants.SENT_KEY, false )); } } public abstract class AbstractClient extends AbstractEndpoint implements Client { @Override public void send (Object message, boolean sent) throws RemotingException { if (send_reconnect && !isConnected()) { connect(); } Channel channel = getChannel(); if (channel == null || !channel.isConnected()) { throw new RemotingException (this , "message can not send ..." ); } channel.send(message, sent); } protected abstract Channel getChannel () ; }
再默认得情况下,Dubbo使用得是Netty作为底层得通信框架,下面我们来分析一下NettyClient类中getChannel`方法得实现逻辑。
1
2
3
4
5
6
7
8
9
10
11
12
13
14
15
16
17
18
19
20
21
22
23
24
25
26
27
28
29
30
31
32
33
34
35
36
37
38
39
40
41
42
43
44
45
46
47
48
49
50
51
52
public class NettyClient extends AbstractClient { private volatile Channel channel; @Override protected com.alibaba.dubbo.remoting.Channel getChannel () { Channel c = channel; if (c == null || !c.isConnected()) return null ; return NettyChannel.getOrAddChannel(c, getUrl(), this ); } } final class NettyChannel extends AbstractChannel { private static final ConcurrentMap<org.jboss.netty.channel.Channel, NettyChannel> channelMap = new ConcurrentHashMap <org.jboss.netty.channel.Channel, NettyChannel>(); private final org.jboss.netty.channel.Channel channel; private NettyChannel (org.jboss.netty.channel.Channel channel, URL url, ChannelHandler handler) { super (url, handler); if (channel == null ) { throw new IllegalArgumentException ("netty channel == null;" ); } this .channel = channel; } static NettyChannel getOrAddChannel (org.jboss.netty.channel.Channel ch, URL url, ChannelHandler handler) { if (ch == null ) { return null ; } NettyChannel ret = channelMap.get(ch); if (ret == null ) { NettyChannel nc = new NettyChannel (ch, url, handler); if (ch.isConnected()) { ret = channelMap.putIfAbsent(ch, nc); } if (ret == null ) { ret = nc; } } return ret; } }
拿到NettyChannel实例之后,就可以进行后序的调用。
1
2
3
4
5
6
7
8
9
10
11
12
13
14
15
16
17
18
19
20
21
22
23
24
25
26
27
28
29
30
31
public void send (Object message, boolean sent) throws RemotingException { super .send(message, sent); boolean success = true ; int timeout = 0 ; try { ChannelFuture future = channel.write(message); if (sent) { timeout = getUrl().getPositiveParameter(Constants.TIMEOUT_KEY, Constants.DEFAULT_TIMEOUT); success = future.await(timeout); } Throwable cause = future.getCause(); if (cause != null ) { throw cause; } } catch (Throwable e) { throw new RemotingException (this , "Failed to send message ..." ); } if (!success) { throw new RemotingException (this , "Failed to send message ..." ); } }
到此调用请求就发出去了,当然再Netty中还有出站数据的编码操作,这里就不分析了。
整个调用路径是这个样子的:
1
2
3
4
5
6
7
8
9
10
11
12
13
14
15
16
proxy0#sayHello(String) —> InvokerInvocationHandler#invoke(Object, Method, Object[]) —> MockClusterInvoker#invoke(Invocation) —> AbstractClusterInvoker#invoke(Invocation) —> FailoverClusterInvoker#doInvoke(Invocation, List<Invoker<T>>, LoadBalance) —> Filter#invoke(Invoker, Invocation) —> ListenerInvokerWrapper#invoke(Invocation) —> AbstractInvoker#invoke(Invocation) —> DubboInvoker#doInvoke(Invocation) —> ReferenceCountExchangeClient#request(Object, int ) —> HeaderExchangeClient#request(Object, int ) —> HeaderExchangeChannel#request(Object, int ) —> AbstractPeer#send(Object) —> AbstractClient#send(Object, boolean ) —> NettyChannel#send(Object, boolean ) —> NioClientSocketChannel#write(Object)
服务提供方处理逻辑 接收请求 前面说过,默认情况下 Dubbo 使用 Netty 作为底层的通信框架。Netty 检测到有数据入站后,首先会通过解码器对数据进行解码,并将解码后的数据传递给下一个入站处理器的指定方法。
这里直接分析请求数据的解码逻辑,忽略中间过程.
1
2
3
4
5
6
7
8
9
10
11
12
13
14
15
16
17
18
19
20
21
22
23
24
25
26
27
28
29
30
31
32
33
34
35
36
37
38
39
40
41
42
43
44
45
46
47
48
49
50
51
52
53
54
55
56
57
58
59
60
61
62
63
64
65
66
67
public class ExchangeCodec extends TelnetCodec { @Override public Object decode (Channel channel, ChannelBuffer buffer) throws IOException { int readable = buffer.readableBytes(); byte [] header = new byte [Math.min(readable, HEADER_LENGTH)]; buffer.readBytes(header); return decode(channel, buffer, readable, header); } @Override protected Object decode (Channel channel, ChannelBuffer buffer, int readable, byte [] header) throws IOException { if (readable > 0 && header[0 ] != MAGIC_HIGH || readable > 1 && header[1 ] != MAGIC_LOW) { int length = header.length; if (header.length < readable) { header = Bytes.copyOf(header, readable); buffer.readBytes(header, length, readable - length); } for (int i = 1 ; i < header.length - 1 ; i++) { if (header[i] == MAGIC_HIGH && header[i + 1 ] == MAGIC_LOW) { buffer.readerIndex(buffer.readerIndex() - header.length + i); header = Bytes.copyOf(header, i); break ; } } return super .decode(channel, buffer, readable, header); } if (readable < HEADER_LENGTH) { return DecodeResult.NEED_MORE_INPUT; } int len = Bytes.bytes2int(header, 12 ); checkPayload(channel, len); int tt = len + HEADER_LENGTH; if (readable < tt) { return DecodeResult.NEED_MORE_INPUT; } ChannelBufferInputStream is = new ChannelBufferInputStream (buffer, len); try { return decodeBody(channel, is, header); } finally { if (is.available() > 0 ) { try { StreamUtils.skipUnusedStream(is); } catch (IOException e) { logger.warn(e.getMessage(), e); } } } } }
上面方法通过检测消息头中的魔数是否与规定的魔数相等,提前拦截掉非常规数据包,比如通过 telnet 命令行发出的数据包。接着再对消息体长度,以及可读字节数进行检测。最后调用 decodeBody 方法进行后续的解码工作,ExchangeCodec 中实现了 decodeBody 方法,但因其子类 DubboCodec 覆写了该方法,所以在运行时 DubboCodec 中的 decodeBody 方法会被调用。下面我们来看一下该方法的代码。
1
2
3
4
5
6
7
8
9
10
11
12
13
14
15
16
17
18
19
20
21
22
23
24
25
26
27
28
29
30
31
32
33
34
35
36
37
38
39
40
41
42
43
44
45
46
47
48
49
50
51
52
53
54
55
56
57
58
59
60
61
62
63
public class DubboCodec extends ExchangeCodec implements Codec2 { @Override protected Object decodeBody (Channel channel, InputStream is, byte [] header) throws IOException { byte flag = header[2 ], proto = (byte ) (flag & SERIALIZATION_MASK); Serialization s = CodecSupport.getSerialization(channel.getUrl(), proto); long id = Bytes.bytes2long(header, 4 ); if ((flag & FLAG_REQUEST) == 0 ) { } else { Request req = new Request (id); req.setVersion(Version.getProtocolVersion()); req.setTwoWay((flag & FLAG_TWOWAY) != 0 ); if ((flag & FLAG_EVENT) != 0 ) { req.setEvent(Request.HEARTBEAT_EVENT); } try { Object data; if (req.isHeartbeat()) { data = decodeHeartbeatData(channel, deserialize(s, channel.getUrl(), is)); } else if (req.isEvent()) { data = decodeEventData(channel, deserialize(s, channel.getUrl(), is)); } else { DecodeableRpcInvocation inv; if (channel.getUrl().getParameter( Constants.DECODE_IN_IO_THREAD_KEY, Constants.DEFAULT_DECODE_IN_IO_THREAD)) { inv = new DecodeableRpcInvocation (channel, req, is, proto); inv.decode(); } else { inv = new DecodeableRpcInvocation (channel, req, new UnsafeByteArrayInputStream (readMessageData(is)), proto); } data = inv; } req.setData(data); } catch (Throwable t) { req.setBroken(true ); req.setData(t); } return req; } } }
如上,decodeBody 对部分字段进行了解码,并将解码得到的字段封装到 Request 中。随后会调用 DecodeableRpcInvocation 的 decode 方法进行后续的解码工作。此工作完成后,可将调用方法名、attachment、以及调用参数解析出来。下面我们来看一下 DecodeableRpcInvocation 的 decode 方法逻辑。
1
2
3
4
5
6
7
8
9
10
11
12
13
14
15
16
17
18
19
20
21
22
23
24
25
26
27
28
29
30
31
32
33
34
35
36
37
38
39
40
41
42
43
44
45
46
47
48
49
50
51
52
53
54
55
56
57
58
59
60
61
62
63
64
65
66
67
68
69
70
71
72
73
74
75
public class DecodeableRpcInvocation extends RpcInvocation implements Codec , Decodeable { @Override public Object decode (Channel channel, InputStream input) throws IOException { ObjectInput in = CodecSupport.getSerialization(channel.getUrl(), serializationType) .deserialize(channel.getUrl(), input); String dubboVersion = in.readUTF(); request.setVersion(dubboVersion); setAttachment(Constants.DUBBO_VERSION_KEY, dubboVersion); setAttachment(Constants.PATH_KEY, in.readUTF()); setAttachment(Constants.VERSION_KEY, in.readUTF()); setMethodName(in.readUTF()); try { Object[] args; Class<?>[] pts; String desc = in.readUTF(); if (desc.length() == 0 ) { pts = DubboCodec.EMPTY_CLASS_ARRAY; args = DubboCodec.EMPTY_OBJECT_ARRAY; } else { pts = ReflectUtils.desc2classArray(desc); args = new Object [pts.length]; for (int i = 0 ; i < args.length; i++) { try { args[i] = in.readObject(pts[i]); } catch (Exception e) { if (log.isWarnEnabled()) { log.warn("Decode argument failed: " + e.getMessage(), e); } } } } setParameterTypes(pts); Map <String, String> map = (Map<String, String>) in.readObject(Map.class); if (map != null && map.size() > 0 ) { Map <String, String> attachment = getAttachments(); if (attachment == null ) { attachment = new HashMap <String, String>(); } attachment.putAll(map); setAttachments(attachment); } for (int i = 0 ; i < args.length; i++) { args[i] = decodeInvocationArgument(channel, this , pts, i, args[i]); } setArguments(args); } catch (ClassNotFoundException e) { throw new IOException (StringUtils.toString("Read invocation data failed." , e)); } finally { if (in instanceof Cleanable) { ((Cleanable) in).cleanup(); } } return this ; } }
上面的方法通过反序列化将诸如 path、version、调用方法名、参数列表等信息依次解析出来,并设置到相应的字段中,最终得到一个具有完整调用信息的 DecodeableRpcInvocation 对象。
到这里,请求数据解码的过程就分析完了。
调用服务 解码器将数据包解析成 Request 对象后,NettyHandler 的 messageReceived 方法紧接着会收到这个对象,并将这个对象继续向下传递。这期间该对象会被依次传递给 NettyServer、MultiMessageHandler、HeartbeatHandler 以及 AllChannelHandler。最后由 AllChannelHandler 将该对象封装到 Runnable 实现类对象中,并将 Runnable 放入线程池中执行后续的调用逻辑。整个调用栈如下:
1
2
3
4
5
6
NettyHandler#messageReceived(ChannelHandlerContext, MessageEvent) —> AbstractPeer#received(Channel, Object) —> MultiMessageHandler#received(Channel, Object) —> HeartbeatHandler#received(Channel, Object) —> AllChannelHandler#received(Channel, Object) —> ExecutorService#execute(Runnable) // 由线程池执行后续的调用逻辑
线程派发模型 Dubbo将底层通信框架中接收请求的线程称为IO线程。如果一些事件处理逻辑可以很快执行完,比如只再内存打一个标记,此时直接在IO线程上执行该段逻辑即可。但如果事件的处理逻辑比较耗时,比如该段逻辑发起数据库查询或者HTTP请求。此时我就不应该让事件处理逻辑在IO线程上执行,而是应该派发到线程池中执行。原因也很简单,IO线程主要用于接收请求,如果IO线程被占满,将导致它请求接收新的请求。
在前文提到的原理图中,Dispatcher就是线程派发器。它的真实职责是创建具有线程派发能力的Channelhandler,比如AllChannelHandler,MessageOnlyChannelHandler和ExecutionChannelHandler 等,其本身并不具有线程派发能力。
Dubbo支持的不同线程派发策略
在默认配置下,Dubbo使用all派发策略,即将所有的消息都派发到线程池中。下面我们来分析一下AllChannelHandler的代码。
1
2
3
4
5
6
7
8
9
10
11
12
13
14
15
16
17
18
19
20
21
22
23
24
25
26
27
28
29
30
31
32
33
34
35
36
37
38
39
40
41
42
43
44
45
46
47
48
49
50
51
52
53
54
55
56
57
58
59
60
61
62
63
64
65
66
67
68
public class AllChannelHandler extends WrappedChannelHandler { public AllChannelHandler (ChannelHandler handler, URL url) { super (handler, url); } @Override public void connected (Channel channel) throws RemotingException { ExecutorService cexecutor = getExecutorService(); try { cexecutor.execute(new ChannelEventRunnable (channel, handler, ChannelState.CONNECTED)); } catch (Throwable t) { throw new ExecutionException (..., " error when process connected event ." , t); } } @Override public void disconnected (Channel channel) throws RemotingException { ExecutorService cexecutor = getExecutorService(); try { cexecutor.execute(new ChannelEventRunnable (channel, handler, ChannelState.DISCONNECTED)); } catch (Throwable t) { throw new ExecutionException (..., "error when process disconnected event ." , t); } } @Override public void received (Channel channel, Object message) throws RemotingException { ExecutorService cexecutor = getExecutorService(); try { cexecutor.execute(new ChannelEventRunnable (channel, handler, ChannelState.RECEIVED, message)); } catch (Throwable t) { if (message instanceof Request && t instanceof RejectedExecutionException){ Request request = (Request)message; if (request.isTwoWay()){ String msg = "Server side(" + url.getIp() + "," + url.getPort() + ") threadpool is exhausted ,detail msg:" + t.getMessage(); Response response = new Response (request.getId(), request.getVersion()); response.setStatus(Response.SERVER_THREADPOOL_EXHAUSTED_ERROR); response.setErrorMessage(msg); channel.send(response); return ; } } throw new ExecutionException (..., " error when process received event ." , t); } } @Override public void caught (Channel channel, Throwable exception) throws RemotingException { ExecutorService cexecutor = getExecutorService(); try { cexecutor.execute(new ChannelEventRunnable (channel, handler, ChannelState.CAUGHT, exception)); } catch (Throwable t) { throw new ExecutionException (..., "error when process caught event ..." ); } } }
请求对象会被封装 ChannelEventRunnable 中,ChannelEventRunnable 将会是服务调用过程的新起点。所以接下来我们以 ChannelEventRunnable 为起点向下探索。
调用服务 我们从ChannelEventRunnable开始分析。
1
2
3
4
5
6
7
8
9
10
11
12
13
14
15
16
17
18
19
20
21
22
23
24
25
26
27
28
29
30
31
32
33
34
35
36
37
38
39
40
41
42
43
public class ChannelEventRunnable implements Runnable { private final ChannelHandler handler; private final Channel channel; private final ChannelState state; private final Throwable exception; private final Object message; @Override public void run () { if (state == ChannelState.RECEIVED) { try { handler.received(channel, message); } catch (Exception e) { logger.warn("... operation error, channel is ... message is ..." ); } } else { switch (state) { case CONNECTED: try { handler.connected(channel); } catch (Exception e) { logger.warn("... operation error, channel is ..." ); } break ; case DISCONNECTED: case SENT: case CAUGHT: default : logger.warn("unknown state: " + state + ", message is " + message); } } } }
ChannelEventRunnable仅仅是一个中转站,它的run方法中并不包含具体的调用逻辑,仅用于将参数传给其它的ChannelHandler对象进行处理,该对象类型为DecodeHandler.
1
2
3
4
5
6
7
8
9
10
11
12
13
14
15
16
17
18
19
20
21
22
23
24
25
26
27
28
29
30
31
32
33
34
35
36
37
38
39
40
41
42
public class DecodeHandler extends AbstractChannelHandlerDelegate { public DecodeHandler (ChannelHandler handler) { super (handler); } @Override public void received (Channel channel, Object message) throws RemotingException { if (message instanceof Decodeable) { decode(message); } if (message instanceof Request) { decode(((Request) message).getData()); } if (message instanceof Response) { decode(((Response) message).getResult()); } handler.received(channel, message); } private void decode (Object message) { if (message != null && message instanceof Decodeable) { try { ((Decodeable) message).decode(); } catch (Throwable e) { if (log.isWarnEnabled()) { log.warn("Call Decodeable.decode failed: " + e.getMessage(), e); } } } } }
DecodeHandler主要是包含了一些解码逻辑。之前提到请求解码可以在IO线程上执行,也可以在线程池中执行,这取决于运行时配置。DecodeHandler存在意义就是保证请求或响应对象可在线程池中被解码。解码完毕后,完全解码后的Request对象会继续先后传递,下一站是HeaderExchangeHandler.
1
2
3
4
5
6
7
8
9
10
11
12
13
14
15
16
17
18
19
20
21
22
23
24
25
26
27
28
29
30
31
32
33
34
35
36
37
38
39
40
41
42
43
44
45
46
47
48
49
50
51
52
53
54
55
56
57
58
59
60
61
62
63
64
65
66
67
68
69
70
71
72
73
74
75
76
77
78
79
80
81
82
83
84
85
86
87
88
public class HeaderExchangeHandler implements ChannelHandlerDelegate { private final ExchangeHandler handler; public HeaderExchangeHandler (ExchangeHandler handler) { if (handler == null ) { throw new IllegalArgumentException ("handler == null" ); } this .handler = handler; } @Override public void received (Channel channel, Object message) throws RemotingException { channel.setAttribute(KEY_READ_TIMESTAMP, System.currentTimeMillis()); ExchangeChannel exchangeChannel = HeaderExchangeChannel.getOrAddChannel(channel); try { if (message instanceof Request) { Request request = (Request) message; if (request.isEvent()) { handlerEvent(channel, request); } else { if (request.isTwoWay()) { Response response = handleRequest(exchangeChannel, request); channel.send(response); } else { handler.received(exchangeChannel, request.getData()); } } } else if (message instanceof Response) { handleResponse(channel, (Response) message); } else if (message instanceof String) { } else { handler.received(exchangeChannel, message); } } finally { HeaderExchangeChannel.removeChannelIfDisconnected(channel); } } Response handleRequest (ExchangeChannel channel, Request req) throws RemotingException { Response res = new Response (req.getId(), req.getVersion()); if (req.isBroken()) { Object data = req.getData(); String msg; if (data == null ) msg = null ; else if (data instanceof Throwable) msg = StringUtils.toString((Throwable) data); else msg = data.toString(); res.setErrorMessage("Fail to decode request due to: " + msg); res.setStatus(Response.BAD_REQUEST); return res; } Object msg = req.getData(); try { Object result = handler.reply(channel, msg); res.setStatus(Response.OK); res.setResult(result); } catch (Throwable e) { res.setStatus(Response.SERVICE_ERROR); res.setErrorMessage(StringUtils.toString(e)); } return res; } }
到这里,我们看到了比较清晰的请求和响应逻辑。对于双向通信,HeaderExchangeHandler 首先向后进行调用,得到调用结果。然后将调用结果封装到 Response 对象中,最后再将该对象返回给服务消费方。如果请求不合法,或者调用失败,则将错误信息封装到 Response 对象中,并返回给服务消费方。接下来我们继续向后分析,把剩余的调用过程分析完。下面分析定义在 DubboProtocol 类中的匿名类对象逻辑,如下:
1
2
3
4
5
6
7
8
9
10
11
12
13
14
15
16
17
18
19
20
21
22
23
24
25
26
27
28
29
30
31
32
33
34
35
36
37
38
39
40
41
42
43
44
45
46
47
48
public class DubboProtocol extends AbstractProtocol { public static final String NAME = "dubbo" ; private ExchangeHandler requestHandler = new ExchangeHandlerAdapter () { @Override public Object reply (ExchangeChannel channel, Object message) throws RemotingException { if (message instanceof Invocation) { Invocation inv = (Invocation) message; Invoker <?> invoker = getInvoker(channel, inv); if (Boolean.TRUE.toString().equals(inv.getAttachments().get(IS_CALLBACK_SERVICE_INVOKE))) { } RpcContext.getContext().setRemoteAddress(channel.getRemoteAddress()); return invoker.invoke(inv); } throw new RemotingException (channel, "Unsupported request: ..." ); } } Invoker <?> getInvoker (Channel channel, Invocation inv) throws RemotingException { int port = channel.getLocalAddress().getPort(); String serviceKey = serviceKey(port, path, inv.getAttachments().get(Constants.VERSION_KEY), inv.getAttachments().get(Constants.GROUP_KEY)); DubboExporter <?> exporter = (DubboExporter<?>) exporterMap.get(serviceKey); if (exporter == null ) throw new RemotingException (channel, "Not found exported service ..." ); return exporter.getInvoker(); } }
以上逻辑用于获取与指定服务对应的 Invoker 实例,并通过 Invoker 的 invoke 方法调用服务逻辑。invoke 方法定义在 AbstractProxyInvoker 中,代码如下。
1
2
3
4
5
6
7
8
9
10
11
12
13
14
15
16
public abstract class AbstractProxyInvoker <T> implements Invoker <T> { @Override public Result invoke (Invocation invocation) throws RpcException { try { return new RpcResult (doInvoke(proxy, invocation.getMethodName(), invocation.getParameterTypes(), invocation.getArguments())); } catch (InvocationTargetException e) { return new RpcResult (e.getTargetException()); } catch (Throwable e) { throw new RpcException ("Failed to invoke remote proxy method ..." ); } } protected abstract Object doInvoke (T proxy, String methodName, Class<?>[] parameterTypes, Object[] arguments) throws Throwable; }
如上,doInvoke 是一个抽象方法,这个需要由具体的 Invoker 实例实现。Invoker 实例是在运行时通过 JavassistProxyFactory 创建的,创建逻辑如下:
1
2
3
4
5
6
7
8
9
10
11
12
13
14
15
16
17
18
19
public class JavassistProxyFactory extends AbstractProxyFactory { @Override public <T> Invoker <T> getInvoker (T proxy, Class<T> type, URL url) { final Wrapper wrapper = Wrapper.getWrapper(proxy.getClass().getName().indexOf('$' ) < 0 ? proxy.getClass() : type); return new AbstractProxyInvoker <T>(proxy, type, url) { @Override protected Object doInvoke (T proxy, String methodName, Class<?>[] parameterTypes, Object[] arguments) throws Throwable { return wrapper.invokeMethod(proxy, methodName, parameterTypes, arguments); } }; } }
Wrapper 是一个抽象类,其中 invokeMethod 是一个抽象方法。Dubbo 会在运行时通过 Javassist 框架为 Wrapper 生成实现类,并实现 invokeMethod 方法,该方法最终会根据调用信息调用具体的服务。以 DemoServiceImpl 为例,Javassist 为其生成的代理类如下。
1
2
3
4
5
6
7
8
9
10
11
12
13
14
15
16
17
18
19
20
21
22
23
24
25
26
27
28
29
30
31
/** Wrapper0 是在运行时生成的,大家可使用 Arthas 进行反编译 */ public class Wrapper0 extends Wrapper implements ClassGenerator.DC { public static String[] pns; public static Map pts; public static String[] mns; public static String[] dmns; public static Class[] mts0; // 省略其他方法 public Object invokeMethod(Object object, String string, Class[] arrclass, Object[] arrobject) throws InvocationTargetException { DemoService demoService; try { // 类型转换 demoService = (DemoService)object; } catch (Throwable throwable) { throw new IllegalArgumentException(throwable); } try { // 根据方法名调用指定的方法 if ("sayHello".equals(string) && arrclass.length == 1) { return demoService.sayHello((String)arrobject[0]); } } catch (Throwable throwable) { throw new InvocationTargetException(throwable); } throw new NoSuchMethodException(new StringBuffer().append("Not found method \"").append(string).append("\" in class com.alibaba.dubbo.demo.DemoService.").toString()); } }
到这里,整个服务调用过程就分析完了。最后把调用过程贴出来,如下:
1
2
3
4
5
6
7
8
9
ChannelEventRunnable#run() —> DecodeHandler#received(Channel, Object) —> HeaderExchangeHandler#received(Channel, Object) —> HeaderExchangeHandler#handleRequest(ExchangeChannel, Request) —> DubboProtocol.requestHandler#reply(ExchangeChannel, Object) —> Filter#invoke(Invoker, Invocation) —> AbstractProxyInvoker#invoke(Invocation) —> Wrapper0#invokeMethod(Object, String, Class[], Object[]) —> DemoServiceImpl#sayHello(String)
服务提供方返回调用结果 服务提供方调用指定服务后,会将调用结果封装到 Response 对象中,并将该对象返回给服务消费方。服务提供方也是通过 NettyChannel 的 send 方法将 Response 对象返回。具体的就不再分析了。
服务消费方接收调用结果 服务消费方在收到响应数据后,首先要做的事情是对响应数据进行解码,得到 Response 对象。然后再将该对象传递给下一个入站处理器,这个入站处理器就是 NettyHandler。接下来 NettyHandler 会将这个对象继续向下传递,最后 AllChannelHandler 的 received 方法会收到这个对象,并将这个对象派发到线程池中。这个过程和服务提供方接收请求的过程是一样的,因此这里就不重复分析了。本节我们重点分析两个方面的内容,一是响应数据的解码过程,二是 Dubbo 如何将调用结果传递给用户线程的。下面先来分析响应数据的解码过程。
响应数据解码 响应数据解码的逻辑主要封装在DubboCodec中。
1
2
3
4
5
6
7
8
9
10
11
12
13
14
15
16
17
18
19
20
21
22
23
24
25
26
27
28
29
30
31
32
33
34
35
36
37
38
39
40
41
42
43
44
45
46
47
48
49
50
51
52
53
54
55
56
57
58
59
60
61
62
63
64
65
66
67
68
69
70
71
public class DubboCodec extends ExchangeCodec implements Codec2 { @Override protected Object decodeBody (Channel channel, InputStream is, byte [] header) throws IOException { byte flag = header[2 ], proto = (byte ) (flag & SERIALIZATION_MASK); Serialization s = CodecSupport.getSerialization(channel.getUrl(), proto); long id = Bytes.bytes2long(header, 4 ); if ((flag & FLAG_REQUEST) == 0 ) { Response res = new Response (id); if ((flag & FLAG_EVENT) != 0 ) { res.setEvent(Response.HEARTBEAT_EVENT); } byte status = header[3 ]; res.setStatus(status); if (status == Response.OK) { try { Object data; if (res.isHeartbeat()) { data = decodeHeartbeatData(channel, deserialize(s, channel.getUrl(), is)); } else if (res.isEvent()) { data = decodeEventData(channel, deserialize(s, channel.getUrl(), is)); } else { DecodeableRpcResult result; if (channel.getUrl().getParameter( Constants.DECODE_IN_IO_THREAD_KEY, Constants.DEFAULT_DECODE_IN_IO_THREAD)) { result = new DecodeableRpcResult (channel, res, is, (Invocation) getRequestData(id), proto); result.decode(); } else { result = new DecodeableRpcResult (channel, res, new UnsafeByteArrayInputStream (readMessageData(is)), (Invocation) getRequestData(id), proto); } data = result; } res.setResult(data); } catch (Throwable t) { res.setStatus(Response.CLIENT_ERROR); res.setErrorMessage(StringUtils.toString(t)); } } else { res.setErrorMessage(deserialize(s, channel.getUrl(), is).readUTF()); } return res; } else { } } }
解码之后,通过DecodeableRpcResult进行调用结果的反序列化。
1
2
3
4
5
6
7
8
9
10
11
12
13
14
15
16
17
18
19
20
21
22
23
24
25
26
27
28
29
30
31
32
33
34
35
36
37
38
39
40
41
42
43
44
45
46
47
48
49
50
51
52
53
54
55
56
57
58
59
60
61
62
63
64
65
66
67
68
69
70
71
72
73
74
75
76
77
78
79
80
81
82
83
84
85
86
87
88
public class DecodeableRpcResult extends RpcResult implements Codec , Decodeable { private Invocation invocation; @Override public void decode () throws Exception { if (!hasDecoded && channel != null && inputStream != null ) { try { decode(channel, inputStream); } catch (Throwable e) { response.setStatus(Response.CLIENT_ERROR); response.setErrorMessage(StringUtils.toString(e)); } finally { hasDecoded = true ; } } } @Override public Object decode (Channel channel, InputStream input) throws IOException { ObjectInput in = CodecSupport.getSerialization(channel.getUrl(), serializationType) .deserialize(channel.getUrl(), input); byte flag = in.readByte(); switch (flag) { case DubboCodec.RESPONSE_NULL_VALUE: break ; case DubboCodec.RESPONSE_VALUE: break ; case DubboCodec.RESPONSE_WITH_EXCEPTION: break ; case DubboCodec.RESPONSE_NULL_VALUE_WITH_ATTACHMENTS: try { setAttachments((Map<String, String>) in.readObject(Map.class)); } catch (ClassNotFoundException e) { throw new IOException (StringUtils.toString("Read response data failed." , e)); } break ; case DubboCodec.RESPONSE_VALUE_WITH_ATTACHMENTS: try { Type [] returnType = RpcUtils.getReturnTypes(invocation); setValue(returnType == null || returnType.length == 0 ? in.readObject() : (returnType.length == 1 ? in.readObject((Class<?>) returnType[0 ]) : in.readObject((Class<?>) returnType[0 ], returnType[1 ]))); setAttachments((Map<String, String>) in.readObject(Map.class)); } catch (ClassNotFoundException e) { throw new IOException (StringUtils.toString("Read response data failed." , e)); } break ; case DubboCodec.RESPONSE_WITH_EXCEPTION_WITH_ATTACHMENTS: try { Object obj = in.readObject(); if (obj instanceof Throwable == false ) throw new IOException ("Response data error, expect Throwable, but get " + obj); setException((Throwable) obj); setAttachments((Map<String, String>) in.readObject(Map.class)); } catch (ClassNotFoundException e) { throw new IOException (StringUtils.toString("Read response data failed." , e)); } break ; default : throw new IOException ("Unknown result flag, expect '0' '1' '2', get " + flag); } if (in instanceof Cleanable) { ((Cleanable) in).cleanup(); } return this ; } }
向用户线程传递调用结果 响应数据解码完成后,Dubbo 会将响应对象派发到线程池上。要注意的是,线程池中的线程并非用户的调用线程,所以要想办法将响应对象从线程池线程传递到用户线程上。我们之前分析过用户线程在发送完请求后的动作,即调用 DefaultFuture 的 get 方法等待响应对象的到来。当响应对象到来后,用户线程会被唤醒,并通过调用编号 获取属于自己的响应对象。下面我们来看一下整个过程对应的代码。
1
2
3
4
5
6
7
8
9
10
11
12
13
14
15
16
17
18
19
20
21
22
23
24
25
26
27
28
29
30
31
32
33
34
35
36
37
38
39
40
41
42
43
44
45
46
47
48
49
50
51
52
53
54
55
56
57
58
59
60
61
62
63
64
65
66
67
68
public class HeaderExchangeHandler implements ChannelHandlerDelegate { @Override public void received (Channel channel, Object message) throws RemotingException { channel.setAttribute(KEY_READ_TIMESTAMP, System.currentTimeMillis()); ExchangeChannel exchangeChannel = HeaderExchangeChannel.getOrAddChannel(channel); try { if (message instanceof Request) { } else if (message instanceof Response) { handleResponse(channel, (Response) message); } else if (message instanceof String) { } else { handler.received(exchangeChannel, message); } } finally { HeaderExchangeChannel.removeChannelIfDisconnected(channel); } } static void handleResponse (Channel channel, Response response) throws RemotingException { if (response != null && !response.isHeartbeat()) { DefaultFuture.received(channel, response); } } } public class DefaultFuture implements ResponseFuture { private final Lock lock = new ReentrantLock (); private final Condition done = lock.newCondition(); private volatile Response response; public static void received (Channel channel, Response response) { try { DefaultFuture future = FUTURES.remove(response.getId()); if (future != null ) { future.doReceived(response); } else { logger.warn("The timeout response finally returned at ..." ); } } finally { CHANNELS.remove(response.getId()); } } private void doReceived (Response res) { lock.lock(); try { response = res; if (done != null ) { done.signal(); } } finally { lock.unlock(); } if (callback != null ) { invokeCallback(callback); } } }
以上逻辑是将响应对象保存到相应的 DefaultFuture 实例中,然后再唤醒用户线程,随后用户线程即可从 DefaultFuture 实例中获取到相应结果。
为什么要有调用编号?
一般情况下,服务消费方会并发调用多个服务,每个用户线程发送请求后,会调用不同 DefaultFuture 对象的 get 方法进行等待。 一段时间后,服务消费方的线程池会收到多个响应对象。这个时候要考虑一个问题,如何将每个响应对象传递给相应的 DefaultFuture 对象,且不出错。答案是通过调用编号。